
Online Manual and Developer Blog
Version 1.6 is out, and Carl's Animation and Physics Sim Expander has been renamed to Carl's MographFX, a much simpler name. Here are all the new changes in v1.6 that existing and future customers can take advantage of! Find Carl's MographFX Addon for Blender at BlenderMarket
The particle emit on death tool now offers you the opportunity to choose between particles, fluid, or both. This can allow you to tell the emitter to automatically use inflow for a set amount of frames the moment a particle dies. Use with smoke or fluid simulations to get fire, smoke, and liquid at the impact sites.
A customer requested the ability to repeat a particle system on a single object, but I realized we also need to be able to duplicate the particle system for usage with collections in both particle emit on death and track particle positions. Thanks to Dan's request, we can now do both. Find this new tool in utilities, where you can tell the tool how long you want the bursts to fire, and how many total bursts should take place. You can also randomize the timing between bursts a tad. If you get the animation correct on the first system, all the babies will inherit those animations but will have their own unique particle system settings/seed to randomize things a bit.
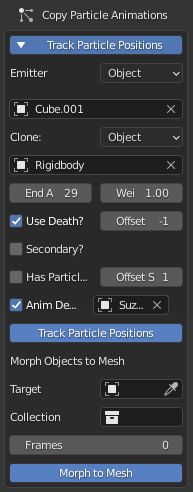
This feature has grown so much that I've renamed it to Particles to Sim & Animate. It can not only track particle positions and generate rigidbodies, but also comes with the same functionality as the Particle Emit on Death tool. This one is good for generating smoke/fire or liquid at the beginning of a particle animation and killing it off at the end. Use this to get unique fluid simulation animations based on particle movements.
Another new feature is the ability to Animate to Mesh. This does what it sounds, it will start the particles in their normal animation and proceed to change destination upon death/timer toward a mesh, where they will take a place on a vertex. They can also be told to use the voxelize scan mode, allowing you to fill the mesh. Use this with wind and other force fields to get particles going in the correct direction. They'll zip to their chosen spot. You can also use closest and replace location with an empty to tell all particles to 'pretend' they are at the location of the empty, so you can fill a mesh from top to bottom, for example.
The curve tool now supports the abiliity to curve a particle clone's animation based on its last time alive. This means the keyframe immediately after can be told to take curves in the x, y, or z. Find this new option under Curve Keyframes. Select the frame range drop down and change it to last alive.
Voxelize is one of my favorite tools because it's been nurtured quite a bit. This tool now offers 'sculpt' mode that will allow you to create objects around the voxelized mesh. Use the Animate tool to offset when their animated moment ends to get one side to fall off first, revealing the mesh beneath.
We also have Vary Sizes for Voxelize now, which will attempt to use from 3x3 to 5x5 blocks in places they'll fit. You can tell it to only look at the fill of a mesh. Use this to keep the total object count down while avoiding hollow meshes. It also works with sculpt mode, some of the time.
First released late in v1.5's cycle, Particle and Object form got a lot of love from me. This is similar to the ability created for Particles to Sim and Animate, but will use a collection to form another object. So, using this you can use the particle collection you start with (or a voxelized mesh) and tell the objects to form a second mesh, allowing morphing animations! You can do this as many times as you want.
This mode defaults to vertices much like the other but can also use scan mode to fill the entire mesh. If you use ensure fill, it'll also subtly hide some objects to guarantee your second target is filled. You can use replace location/use distance with an empty to alter how and where the mesh is formed. Use curve tools to create unique morph animations once you're done!
Version 1.56 features an improvement to Form from Particles found under the Track Particle Positions tool. Both of the tools can now use a Closest option, meaning each individual particle or collection object will search the mesh destination to find the closest vertex to occupy, then take that spot off the list of possibilities. This helps make the animations look more clean than random positions, but is optional. If there are less particles than there are vertices on the destination, you might still wish to use random to make sure there aren't massive holes in an area no particles are close enough to fill. If the particles run out of spots to occupy, they automatically switch to random mode and overlap so as to hide so that you can use multiple meshes with different amounts of vertices.
The new Form feature is one of my favorites, ever. It's composed of two tools. Here's a step by step guide to using it:
Now The Second Tool!
This part is broken into a second tool for a very good reason. It allows you to pick a target and a collection. The Objects will move to a random vertex on the destination mesh. So the particle tool can give you a collection of small objects, but you can also use your own collection of objects to move toward a mesh.
The best part about this tool is that after one, you can use a second mesh and get the particles to move into position on yet another mesh, as many times as you want and as fast as you want using the frames setting.
This is seen in the animation above, where I used the particle system and wind effects to start animating the objects, then shifted them upon particle death to going toward their destinations. I used a very wide lifetime randomness on the particle system so they would not all die at the same time.
So this gives us the ability to use wind and turbulence to animate particles and (somewhat) gracefully turn them into individual animated objects that can morph. In a way it is inspired by Trapcode Form for After Effects.

Version 1.5 has started strong with the new ability to use collections on both the Track Particle Positions (particles to rigidbodies tool) and Particle Emit on Death tools. This unlocks many, many possibilities.
For instance, you could have a collection of varied shapes for use in your physics simulations. Do you have multiple emitters? Track them all at once! With secondary explosions from particle emit on death, this can be really useful. You can also duplicate your secondary emitters and create different explosion forces so that the script can randomly select them.
I want to explain the 'Fully Random' function. With this setting on, each particle of every parent/main emitter will pick randomly from your secondaries. So if each emitter puts out 50 particles, they can all be very different. But it looks very homogenous with uses like fireworks. With fully random off, you can guarantee each of your parent emitters will pick only ONE secondary, so that explosion will always use those debris or particles.
Because particles to rigidbodies also supports collections, you could then select this new collection of emitters and turn all the secondary emissions into rigidbodies!
The Copy Animation tool has a new feature in this version, as well. Pick an object to copy from, then select 'only one' and it will show all the animations associated with that object. Now, if you select an object with that data path from the drop down menu selected, it will copy only that animation. This doesn't work great with position/location when the object already has animations in that same category, but it can certainly be a life saver if you want to copy an animated value and do not want to overwrite others.
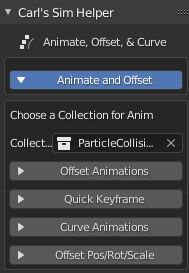
Version 1.4 saw my Animate, Offset, and Curve function become my most powerful single feature in the addon. It's really a group of four tools, but they all work together using a lone collection. Give it a ton of objects, and it can establish the animations for you, scatter the objects so their animation on or off-screen is not too uniform, and offset those animations in a single click. When that is done, you can tell the animations to curve to the extreme without having to do this with hundreds or thousands of objects selected.
The tool was compacted into a single menu with collapsible sub-menus. You can still use it with selected objects if putting them into collections isn't your thing, but it's MUCH faster to not have objects selected in Blender when trying to do literally anything. This grows more apparent the more you have selected.
The Offset Pos/Rot/Scale button at the bottom right is only slightly connected to animation. It allows you to offset those 3 physical properties on an object and keyframe them if you like. You can get really neat movements with hundreds of objects all going in order based on where they are in the list, or in relation to an objects with distance search. You can of coruse reverse both of these.
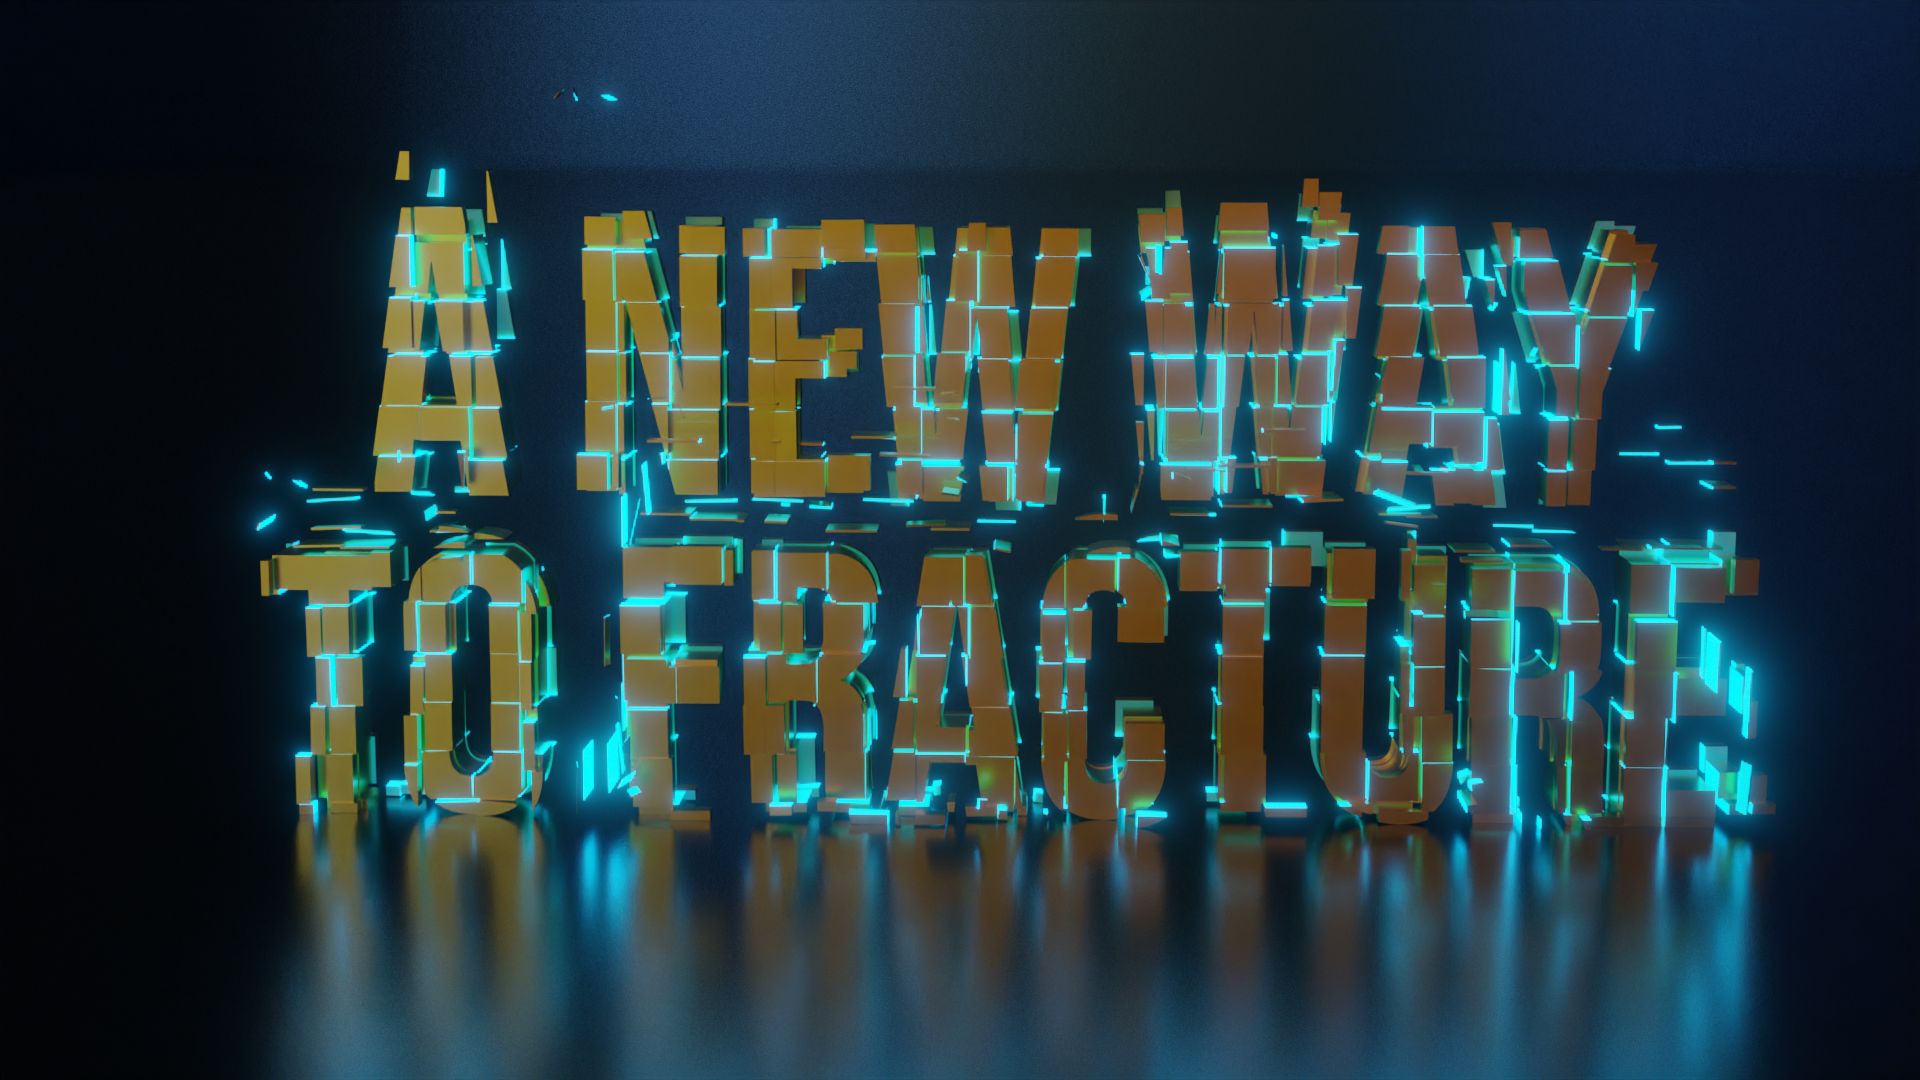
The other major improvement during the 1.4 series was the new ability to fracture objects with Voxelize. Using any custom object (or just a square) you can now use Booleans to cover an object in many little objects, and have each of them take on the shape of the target in the area they are located. It's great for motion graphics with words and text as it's near-seamless unlike the typical fracture tool, so once assembled they should not be obviously fractured.
During 1.4 I also added the following features:
This time of development saw heavy improvements to Voxelize, because I enjoyed working on the tool and making it better. It could now color objects based on their location, and users could now use a custom object instead of the default cube/sphere the tool launched with. This creates a lot of possibilities for fracturing objects if you use a high resolution. For instance long/wide objects will look very different to a cube when fracturing.
Version 1.1 introduced the ability to voxelize objects, transforming them into spheres or cubes with a resolution as high as you'd like. The script could now scan a mesh and make thousands of objects out of this mesh for use with motion graphics, physics simulations, or both.
It also featured the following improvements: