Terraria: Moon Lord Boss Guide
Battle Strategies and Boss Arena Tips
 The Moon Lord is the final boss of the Lunar Event, and Terraria 1.3 - this guide should give you some strategies to help you beat him and score that great loot!
 Life: 25k each (hand eyes), 45k (head eye), 50k (chest). 145,000 total.
Drops: Various weapons and Luminite for Armor Crafting. See the list of Moon Lord loot at the bottom.
Defeating the Moon Lord is a challenge to many players. My first time was a disaster; it forced me to learn the fight and I was pleased with the difficulty. This guide will focus on the Moon Lord, his attacks, and how you can setup your arena and character to beat this 'final' boss of Terraria. Included at the bottom of the guide is a list of all his drops, with descriptions of their uses.
Importance of Potions
This is the hardest boss in Terraria, nearly as bad as Duke Fishron, and if you're got combat potions you should use them. I have a list of useful combat potions that describes how to get their ingredients. I highly recommend Ironskin (+8 Armor), Regeneration (+2 HP/sec regen), Rage/Wrath (for Crimson/Corruption, 10% damage each), Archery (big boost if using a bow), Lifeforce (for 600 Life), and Endurance Potions (10% Damage reduction) at the bare minimum. That's like, all of them except the visibility potions. Yeah, just use all the potions. The Arena is every bit as important, so you have a good place to fight.
 Having a good Boss Arena is about taking advantage of the tools the developers gave us, with thought to the boss fight itself and what we can do to improve our own performance with these factors. Check my guide for details.
Importance of An Arena
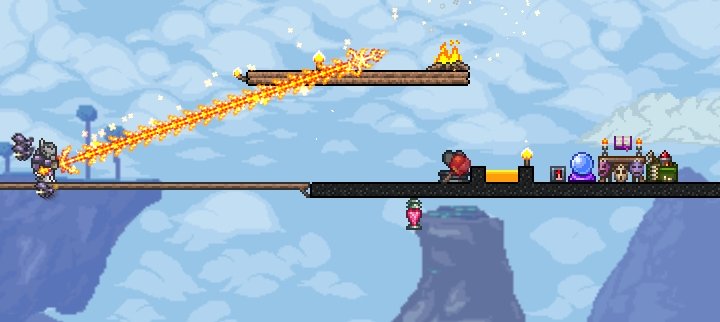
An area with at least campfires, flat ground, and some solid blocks to duck under are recommended. But you could go all out, as I've done in my strategy video below. I've got a guide to my Moon Lord (and other boss) Arena that may be helpful to players struggling with this fight. It makes conservative use of heart statues and honey to help regenerate health. You'll have the crystal ball, ammo box, and bewitching table nearby to help boost damage if you use those, campfires/heart lanterns to regen, and sunflowers for movement speed aura. In Beetle Armor, I was practically able to tank all his damage with no thought to my survival with this setup.
There are other ideas for fighting Moon Lord outlined below his weapon/trophy drop list, under 'Other Fight Strategies'. Look for a link to the minecart method to beating Moon Lord on Expert difficulty.
How to Fight
Summoning the Moon Lord
Moon Lord will be summoned after the defeat of the 4th Lunar Pillar (an epic event that comes after defeat of the Lunatic Cultist, no matter which it is. You'll have about 1 minute to get to your fighting location before the combat begins. Grab your fragments and head home, ready to do battle. If you're weak, see a nurse or immediately drink a healing potions.
Moon Lord can also be summoned by himself by using an Ancient Manipulator (dropped by said cultist) to combine 20 of each type of vortex, nebula, stardust, and solar fragment into a Celestial Sigil. These summon him, but you should only use it if you've got an abundance of those and already have the armor/gear you want. Gear takes luminite and fragments. Fragments exclusively are used for weapons.
Boss Battle Video
Here's one of my recent fights with the Moon Lord, showing off the arena I've linked to above. There are captions to describe certain aspects of the fight. If you need more info, see below for more in-depth strategy info.
Moon Lord Fight Information
 Having a solid platform to run under can protect you from the death ray when the main eye opens, then you can proceed to kick some ass.
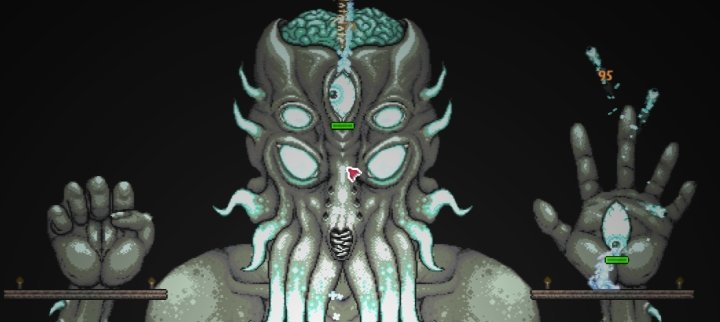
Main Characteristics
There are two hands (25k life each and 40 defense), which open regularly to fire spheres at you, along with homing projectiles. Additionally, there's the main eye, which when hovered says just 'Moon Lord'. It has 45k life and opens less often than the hands. Every time the eye opens, it will fire his most powerful attack - the Phantasmal Deathray. It can deal 100 damage to a player with 100 defense on normal difficulty. 120 to a squishier character with 60 armor. This is why I recommend either having something to stand under (solid blocks) to avoid the beam entirely, or else having so much healing potential around you that it doesn't matter. Later, greater threats present themselves.
Moon Lord Attacks
- Phantasmal Deathray (150 damage) - Fires each time the eye opens, sweeping across the ground. Can be dodged by going under blocks, or flying up and over it.
- Phantasmal Bolt (60 damage) - All three eyes fire this. It's not very threatening, but can help to whittle you down.
- Phantasmal Eye (60 damage) - Like above, not too threatening but can hurt. These come out in a line then sweep down diagonally. So much is going on that it's hard to avoid them sometimes, but you can find a gap in the pattern and they'll miss.
- Tentacle - A tentacle comes from the Moon Lord, which will attach to you and spawn clots. Kill the clots or else the main eye gets healed for 1,000 life for each of them. It is not a big deal, but for players using vampire knives it causes the Moon Bite debuff that prevents healing.
- True Eye of Cthulhu Bolt Clusters (60 damage each) - The eyes, when freed, will fire Phantasmal Eyes in groups forming an octagon shape that are much harder to avoid. It is possile for two of them to strike you in quick succession becaue of the size of the group and their movement speed. The Star Veil (Star Cloak + Cross Necklace) can help with this as it increases invincibility duration. Having two of these attacking you while you still need to take out the main eye is probably what kills a lot of players!
 If you free the eyes from the hands too early, the True Eyes of Cthulhu will harass you the entire fight.
Key to defeating the Moon Lord is to balance out damage. You don't want to kill off one hand really early in the fight, then have the other at full health along with the head. If you do that, you'll have an invincible opponent that continually attacks you for the duration of the fight and does so more frequently and with attacks that are harder to avoid.
If you get both hands low, but focus on the eye each time it opens, you'll have a much easier time. You'll note the main eye doesn't open very often, so it's very important to lay into it when it does, but watch out for the death ray. Defeating it first would be good, but is unlikely. When they're all below 20% life, start finishing them off.
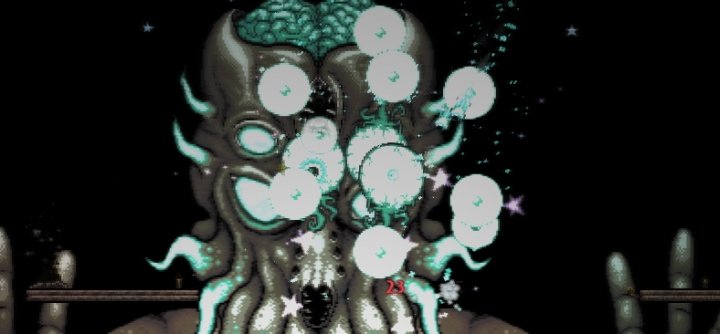 True Eyes of Cthulhu will fire these huge spherical formations of Phantasmal Eyes, which are quite difficult to dodge. Earlier in the fight, the eyes come out in a line and go down diagonally and are easier to avoid.
True Eyes of Cthulhu (Defeated Eyes)
these are mentioned above. Once an eye is freed, it continues firing at you and is no longer a target. Its attacks are more difficult to avoid and come more frequently. Don't bother targeting them, as they're invincible. This was the hardest part of the fight my first few times - the eyes' attacks form a big sphere and hover then launch at you. It's possible to dodge them, but only by moving quickly. They will pass through blocks.
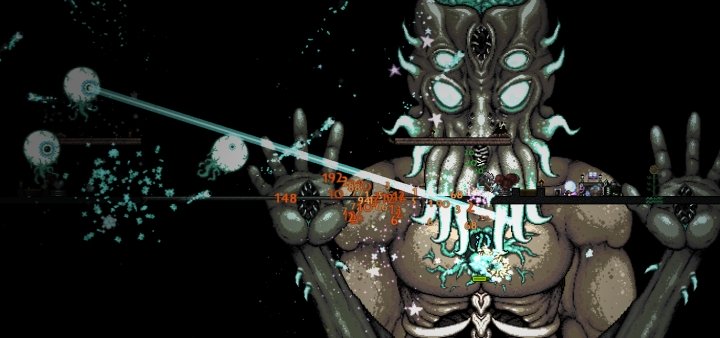
 Once all three eyes are down, the Moon Lord's core is vulnerable. Note I built upon platforms so that I could shoot downard toward it. My own arena may be a bit too high up. You may not have this problem and can use Asphalt to boost movement instead -- unless you're flying in a Cosmic Car!
Defeating the Moon Lord
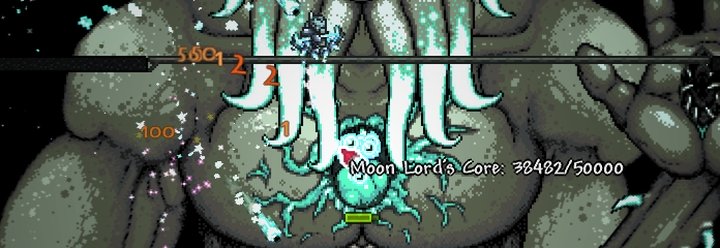
Once you've destroyed all three eyes, the chest will become exposed at last, letting you hit at the titan's heart. It has 70 defense and a whopping 50,000 life - but you're almost 2/3 done with the fight at this point. It gets harder with three true eyes firing at you fairly rapidly, but you can do this! Fire hard at it and dodge where you can, leaning on heart statues and potions to heal you. When the core is defeated, the battle is over.
If You Lose...
You need so many solar fragments and such that it's not a big problem if you lose, though your ego may be bruised. Farming the Lunar Event is just something you have to do if you want to get all the goodies that Terraria 1.3 has to offer. You'll need an abundance of the fragments to make Celestial Sigils, and each of the four armor sets takes fragments, along with the weapons. You need a load of luminite and other materials so take this as a learning experience and carry on. Tweak your build, and assess your arena.
 Defeating the Moon Lord for the first time is an awesome experience, plus the great loot and crafting you can do afterward. Farming him is a pleasure.
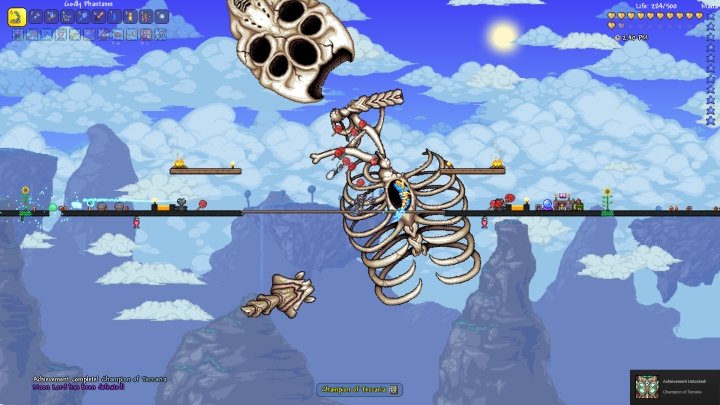
If you Win!
You'll get the achievement, while also having the resources and knowledge to make future fights easier. He is very much worth farming and it takes 2 kills to make a full set of the armor of your choice. All of them are exceptionally powerful when compared to the Chlorophyte-based gear (or Tiki Armor) you used to defeat him.
Moon Lord Weapon Drops List
 Beating Moon Lord numerous times will be necessary to get all the weapons you desire. They all have an equal chance of dropping, but there are 9 main weapons so the chances are low given how long the battle takes to complete.
Along with almost always giving you one of the weapons listed below, the Moon Lord drops Luminite Ore, which can be turned into Bars at the Ancient Manipulator and transformed into armor sets in combination with the stardust/vortex etc. fragments you get from the Lunar Event Pillars. You'll get roughly 80 Luminite for defeating him, which translates to 20 bars. Thankfully, the set items only take about 10-12 bars at most to make, and some are as low as 8. So one win = 2/3 of a set!
Other drops include the Moon Lord Mask and Trophy, which are rare but underscore a great victory on your part. Here is a list of the main weapon drops to seek from the Moon Lord and what they do. Please note it may take many tries to get a specific item, but it can be very much worth the effort for completing your build. You can take a Luminite Bar to the Guide NPC and show it to him in order to see the recipes for all of the things you can craft with it in-game.
Utility: Portal Gun (100% Chance) - The Portal Gun is a 100% drop from Moon Lord, it sells for 10 gold, which is relevant given you may end up with a dozen of them. It has some interesting mechanics, and is obviously a reference to the hit game 'Portal'. Fire once, and you'll make a blue hole. Fire again, make an orange hole. Entering either of the holes will let you come out the other. It can be handy in various situations, and the portals be fired about 10 screens away (1500 blocks). So consider your target and fire it from afar. Going too far from the portal will close it, so if it's used for long range travel the original portal will close.
Ranged (rocket): Celebration (1/9 Chance) - The Celebration is a rocket launcher that double-fires rockets, while only consuming one. It has a 14% crit chance and projectiles fired from it put off a fireworks display. It will not, unfortunately, break tiles even if you are using rockets that are supposed to although this may be unintended... I'm not big on rocket launchers, preferring my bows and magic weapons, so I can only provide the basic info on this one.
Magic: Last Prism (1/9 Chance) - Last Prism is a magic weapon with 100 base damage and consuming 12 mana per second. It fires a huge cone of lasers that gradually converge into a single beam at the cursor location. So it's something you can focus on one enemy on, but the damage has to build up. Targets in the center will take more and more damage as the beams converge. You must be wearing a great caster set and conserve mana. Don't hold it down too long once the beam converges, but rather give your mana a moment to replenish - unless you're a manaholic and use mana flowers habitually. Mana Flowers are made with Nature's Gift and a Mana Potion at the tinkerer's workshop. It will make you auto-consume mana potions when you run out so you can keep casting.
Magic: Lunar Flare (1/9 Chance) - Aside from Celebration, the Lunar Flare is probably my least favorite drop here. I got 2 of them in my first 2 tries on Moon Lord, so maybe it led to some resentment. It has a damage of 100 and consumes 13 mana, sending 3 bolts down toward the cursor's location. It can let you fire over walls, and even through them, but is probably only going to see use in specific situations. It may help a summoner build to do some targeted damage on distant/untargetable enemies while their minions do the grunt work.
Summoner: Lunar Portal Staff (1/9 Chance) - Summons a portal that fires a beam at enemies; lasts 2 minutes and can be used with the Lunar Portal, Spider Queen, and Frost Hydra without impacting minion count - so you can have this out, along with the other three and a minion without even using Stardust/Tiki Armor. Its damage of 50 is deceiving, since it hits rather quickly. That damage can e boosted by Summoner Armor sets and Accessories.
Melee: Meowmere (1/9 Chance) - The Meowmere sword has a base damage of 200 and fires a nyan cat that ricochets and sets of expanding explosions with each bounce. It does this every time it is swung. Rarely, its powerful projectile can be bounced back at you, but only with certain enemies like those from the Solar Pillar and mimics. Everything else gets slaughtered by this weapon, though it is best used in halls and setups where you can take advantage of the bouncing. It can hit an enemy multiple times that way.
Summoner: Rainbow Crystal Staff (1/9 Chance) - Although probably not the most useful wepaon here, it is likely the one to induce the biggest wow factor. This summons a rainbow crystal for 2 minutes at the cursor's location, and can be used with other weapons of this type (Lunar Portal, Spider Queen, Frost Hydra). It will fire an AoE blast of pretty rainbow beams that damage enemies. Its damage of 150 is amplified by the Stardust Armor set, which also gives you a guardian. This along with the Stardust Dragon and Cell may turn you on to a summoner playstyle.
Ranged (bullet): S.D.M.G. (Space Dolphin Machine Gun) (1/9 Chance) - The S.D.M.G. is basically an upgraded Megashark. It has a good base damage of 77 in combination with insanely fast attack speed that works amazingly well with crits. Use it with Chlorophyte or Crystal Bullets for great effect, though eventually you can use Luminite Bullets for massive damage and piercing (not right away, though one bar will make you 333 bullets and the ammo consumption rate is 50%)! Its main perk, aside from the great base stats, is its crit chance being 10% higher than normal at 14% base.
Melee: Star Wrath (1/9 Chance) - The Star Wrath is another sword (my personal favorite over Meowmere). It only has a base damage of 110, which seems laughably low considering Meowmere's 200, but the Star Wrath shoots fireballs from the sky which will deal twice the damage. The stars travel very quickly as they descend, and can be devastating to groups or bosses like Destroyer with multiple parts. Note that you can aim the stars' destination by pointing the cursor, even if you're across the screen - so you can be hacking something close and get the stars to hit something else, or use it like the Terra Blade and simply fire the projectiles. The Star Wrath's projectiles should carry the benefit of flasks and accessories that apply on-hit effects, though the damage is so high it's unlikely you'll notice.
Melee: Terrarian (1/9 Chance) - The most powerful yoyo in Terraria, with a base damage of 190. Use it with a Yoyo Bag or Yoyo Glove for great effect. It fires off projectiles as it spins, and the button can be held to deliver huge damage to a single target as well as those enemies in the area. If you didn't like yoyos before, this one may convert you. Definitely look into the mentioned yoyo accessories to make the best use of the Terrarian.
Other Fight Strategies
The Cosmic Car Key & Shrimpy Truffle
There are two mounts that grant permanent flight while retaining your combat ability - the UFO (car key, dropped by UFO during Martian Madness) and Cute Fishron mount (shrimpy truffle, dropped by Duke Fishron). Farming either of these can be a big help for the fight, but are not required if you've got a good arena and good gear. If your gear is bad, you probably shouldn't be taking on Moon Lord anyway. The main use of these flying mounts is to be able to fly fast enough to avoid the Moon Lord's attacks, and it may be necessary on Expert, but isn't at all on normal difficulty.
Minecart Track
Some players setup an elaborate minecart track in order to be able to outrun the Moon Lord's attacks, and for some players this will be necessary to defeat him on Expert - which is why I'm listing it here. Read up on this complex strategy for being Moon Lord on Expert on the Official Wiki. That link will take you directly to that section on moon lord strategies.
Share Tips and FAQs
Our Sims Forum is the place to go for faster answers to questions and discussions about the game. Use the form below to share your own experiences and provide helpful tips to other readers.
Nothing yet.Join In
Search the Guide
Latest Guides
Follow @carlsguides
Moon Lord
Boss Arena for Moon Lord
Lunatic Cultist (w/ Video)
Farming Biome Keys & Mimics
Tips & FAQS - In Development
Boss Summoning Items New
Mining - New
NPCs & Valid Housing
Good Potions for Miners
Progression Checklist
Making Money in Terraria
Entering Hard Mode
Potions for Boss Battles
Future Plans for the Guide
My Guide was started on Sept 23, 2015 and now includes dozens of pages about the game. I hope I can help newcomers to get a bit more enjoyment ouf of Terraria by demystifying some of how it works. You can provide feedback to me at [email protected]. I am tied up with multiple projects - this, The Sims 4, and Fallout 4 but do plan to return to Terraria and finish the boss guides and some other pages.
